
I’ve been bokashi composting for over 3 years now and I’ve found it to be the simplest and most effective way for processing your kitchen food waste provided that you have a little yard or garden space to work with.
Bokashi composting allows you to compost most anything, gets you to nutrient-rich ready-to-use compost very quickly, and in my experience is really difficult to mess up. It at times can be a little messy and you’ll need to do some digging. But considering all this together, for home-dwellers with yard and/or garden space it’s the most common composting method I recommend.
To be clear, bokashi composting is about composting your kitchen food waste, not yard/landscape debris. Although, composting your food waste with bokashi and composting your yard debris can work together in the same system (which we’ll talk about later).
For those of you who want the TL;DR with a quick summary of what you need to know, the equipment to acquire, and the checklist to follow, just jump right below
For those of you who like to learn a thing or two, we’ll get started with a quick introduction to bokashi composting and the steps to follow further on.
TL:DR – Bokashi Composting
What is it?
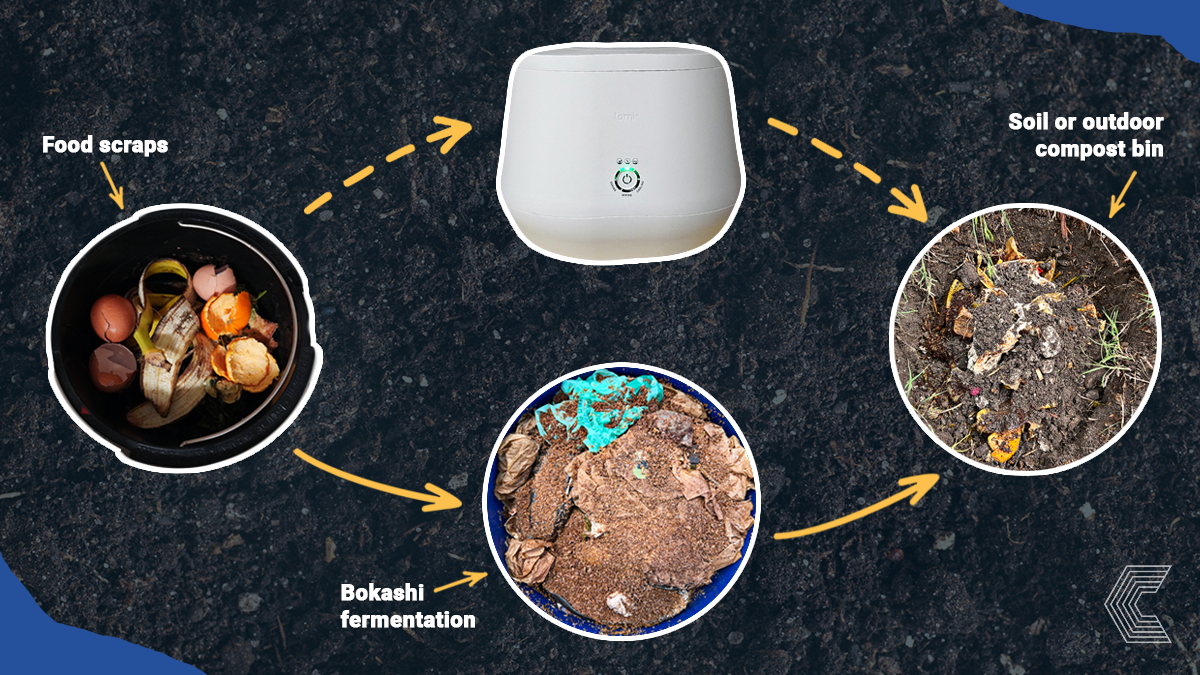
Bokashi Composting is an anaerobic (meaning oxygen-free) process of fermenting food scraps to turn them into a pre-compost. After the bokashi fermentation is complete, creating the pre-compost, the pre-compost must be added to soil to complete the process and create nutrient-rich ready-to-use compost. Bokashi composting requires that you have place to store multiple 2.5 – 5 gallon buckets, have yard/garden space to bury the contents of this process, and buy a regular supply of Bokashi bran. Bokashi composting is easy, and for someone who has a little space (a hose) and wants to utilize the compost themselves, I’d highly recommend. The key to success: keep your compost bin/bucket airtight! That’s what allows fermentation to happen versus putrefaction (that stinks!).
Equipment: What do you need?
$
- 5 Gallon Bucket (Recommend 2x) ≈$10
- Bokashi Bran ≈$90 (every 4-6 months)
- Tamper (I used a hand cultivator for a long time) ≈$15
- Kitchen top12-inch Compost Caddy (I go with stainless steel) ≈$30
- Optional: Hold On Compost Caddy Liners ≈$13
- Garden/Yard Space
- Shovel
$$
Bokashi Bin — TeraGanix Organko (Includes Tamper, Replaces Caddy) (Recommend 2x) ≈$160
Bokashi Bran ≈$90 (every 4-6 months)
Garden/Yard Space
Shovel
Total Setup: ≈$250
Ongoing: $90 every 6 months for Bokashi Bran
How To
- Fill your kitchen compost caddy with food scraps or fill your Organko Bin.
- If using the Organko Bin, sprinkle Bokashi Bran with every food scrap addition. Once full, jump to step #4.
- Once kitchen compost caddy is full, unload into your 5 Gallon Bucket (if first load, sprinkle bottom layer with bokashi).
- Add another light layer of bokashi bran after dumping first half of compost caddy.
- Add rest of compost caddy
- Sprinkle healthy layer of bokashi bran on top.
- Using tamper, press done all food waste + bokashi to reduce any airpockets.
- Repeat until 5 gallon bucket is full.
- Once 5 gallon bucket is full and all food waste has been pressed down firmly, close bucket and make sure it’s 100% airtight. Set aside for 14-21 days.
- After 14-21 days, check bucket to see if you have white fungus.
- If no, add more bokashi bran and wait another 7-14 days.
- Check again until white fungus exists.
- Once white fungus is present, food scraps have fermented and are now “pre-compost.”
- Find a space in your garden or yard (away from any new plantings) and dig a ≈12-inch hole (large enough to hold your pre-compost with ≈6 inches buffer to ground level).
- Dump pre-compost in the hole while layering in with existing soil. Tamp down your pre-compost and soil, then add ≈6 inches to meet ground level again of mulch/soil.
- *Instead of digging a hole, you can add your pre-compost to an existing compost pile. Dig it in reasonably deep.
- Wait ≈4 weeks and dig up newly made compost or plant over time with new plantings.
- Repeat.
📼 VIDEO TUTORIAL
For a different perspective, check out my step-by-step video tutorial to bokashi composting here:
What is Bokashi Composting?
Bokashi is a Japanese word meaning “fermented organic matter.” It’s important to start here because as author Rebecca Louie points out in her excellent book, Compost City, bokashi is the process of fermenting your food scraps (vs. complete composting).
What you get from the Bokashi process is better thought of as a pre-compost or a soil amendment. To complete the process and in fact create garden-ready compost, the bokashi fermented scraps need to be added to a soil ecosystem. From there, the now aerobic (with oxygen) process and soil ecosystem take care of creating the compost we’re looking for.
So, bokashi composting happens in two steps (after collecting your scraps):
- Fermenting food scraps to create pre-compost
- Adding that pre-compost to a soil ecosystem or existing compost system to become nutritionally available for plant life.
Bokashi is an anaerobic process, meaning that it happens without oxygen. That’s why it’s important to compress our scraps that we add to our bins (to reduce air pockets) and make sure that our bins are always sealed airtight after we add anything to them.
Why Bokashi Compost (vs. Other Methods?)
- Compost Anything — Bokashi’s major benefit (to me), is that the rules of what you can compost are so much simpler. Dairy, oily foods, and meat—all in!
- Get Compost FAST! — Relative to other composting methods, compost from the Bokashi method is available fast. Depending on how long it takes you to fill your bin, after a roughly 2-week fermentation period, then 4-6 weeks added to a compost bin system or directly into the ground, the compost should be able to be planted on top of or able to be added to your garden somewhere.
- Hard to Mess Up! — The margin for error for Bokashi composting is high. Chop up your scraps, keep them compacted in your bin, make sure the bin is airtight, and add healthy dosings of bran each time. Very simple in my opinion. As well, if you’ve ever heard of anything like your “browns to greens” ratio, you can forget that! That’s not relevant with Bokashi composting.
- Pest Repellant — Fermenting your food scraps first makes them repellant to pests/rodents when added to an outdoor compost system or dug into the ground. Dig em’ in deep enough, mix with enough soil/mulch and you won’t have a problem. As you could read in Compost City, An urban farm in NYC uses this method and they haven’t had a single rat go after their scraps once fermented! Crazy! After multiple years of bokashi composting myself, I likewise have never encountered a pest issue.
- Bonuses — If you decide to use a premium Bokashi bin (like the Organko) you’ll have a spout built in where you can drain the Bokashi juice every few days. This juice mixed with water (at least 100:1) is a valuable fertilizer to give to your plants. Also, it can be drained right into the sink—it actually helps to clear your pipes!
Cons of Bokashi Composting
- Digging Holes — Once your food scraps have fermented, you now have pre-compost (not compost). To finish the process, one of the things you can do is dig a hole in your yard or garden, dump in your new pre-compost to mix it with the soil, and let the composting process finish. I’ve dug a lot of holes in our yard! Digging holes is hard! And I’d like to save that energy for planting trees, building water retention berms, etc. I’ve found ways to lessen this work which I’ll share in the step-by-step.
- A Little Messy — Bokashi composting isn’t the messiest method of composting that I’ve done, but it can get there. Limit the mess by using a tamper to compress your scraps when you add them. And, get a good hose attachment to clean your bucket after you empty your fermented scraps a few weeks after filling.
- Bran — To Bokashi compost you do need bokashi bran. It’s impossible without it. That requires that you need to keep buying bran or make your own. I haven’t made my own (not sure it’s worth the effort), so, I’m out about $90 every 4-6 months or so for new bran.
🔎 Dig Deeper
Read more on the wonders of compost with our post on the Benefits of Composting
What You Can / Can’t Bokashi Compost
This is one of the best parts of Bokashi composting, you think far less about what you can or can’t compost. Bokashi composting feels like no-rules composting to me, and I love that about it.
What Can Be Composted with Bokashi:
- Anything you’d normally compost (fruit peels, vegetable scraps, etc.)
- Meat
- Dairy
- Prepared, Oily Foods (layer in some browns like cardboard, paper towels, just to lessen the amount of oil/liquid at once if you’re adding a lot).
- Bones
- Compostable Plastics* (be sure to break them down/cut them up)
What Can’t:
- Already Rotten Foods (You can add these to bokashi, but too much at once should be avoided)
- Yard/Garden Debris (You can compost these with bokashi, this is more so a space issue for your bin/buckets).
Equipment Needed
✔️ Bokashi Bin or 5 Gallon Buckets (Cheaper)
I recommend the Organko bin ($90). That came recommended by my friend Alma Rominger and her recommendation has been spot on.
However, I started with multiple 5-gallon buckets that I bought at Home Depot and Lowe’s. I think that’s a great way to start. Cheaper to get started, and with enough time, you’ll see the benefit of the upgraded bin (as I did).
That being said, my buckets are still part of the system just because they can hold so much (2x the Organko), so for a family event or a big fridge clean out, I’ll opt to fill up a bucket vs. the Organko.
Key here bucket or special bin: make sure it seals airtight!
✔️ Bokashi Bran
There are a lot of Bokashi Brans to choose from, but I’ve used the bran that came with the Organko bin and it’s been just fine (TeraGanix Bokashi Bran). The more you buy of this at once the better deal you will get, so I refill with 22 lbs at a time.
✔️ Tamper (if using 5-gallon buckets)
The Organko makes this unnecessary. With the 5-gallon bucket system, I’d recommend it (or something like it) to make things less messy. I used a hand cultivator/digger like this.
✔️ Countertop Composter (if using 5-gallon buckets)
Again, the Organko eliminates the need for an additional countertop composter. I used a stainless steel caddy with bags to line it and that keeps any cleaning to a minimum.
✔️ Optional: Compost Caddy Bags
So many compost caddy bags suck! They rip when you unfold them. I was grateful to come across Hold On bags. They held up for me pretty well with our countertop compost caddy.
✔️ Shovel
✔️ Yard/Garden Space
How to Bokashi Compost
After you have all the equipment needed, here’s the step-by-step to bokashi composting.
I have shared two variations of the step-by-step. One for if you decided to go premium with the Organko Bokashi Bin. The second, if you wanted a lower upfront investment with the 5 Gallon Bucket from somewhere like Home Depot or Lowe’s.
Premium Compost Bin Variation (Like Organko)
1. Add food scraps to your ORGANKO bin, each time adding a light dusting of Bokashi Bran on top of the food scraps. Likewise, each time, replace the leveler to compress scraps and create a seal.
2. Repeat until your bin is full. Again, make sure all scraps are compressed and the sealer is secured to make everything airtight. Plan to set aside (garage, etc.) for ≈14-21 days.
If you forget your bin and let it sit longer, no problem!
Pro-tip: I add a bit of painter’s tape and sharpie the date I sealed things up in case I forget.
3. Using the available spout, empty your Bokashi juice every few days (≈2-3 days). You can empty the juices into a water can and add water (100:1 — Bokashi is strong!) and fertilize your plants. Or, you can just drain the Bokashi juice just straight down the drain (Bokashi juice clears drain sludge! Seriously!).
4. While your first bin is sitting aside,, rotate in an extra bin and work on filling that up, too.
5. After ≈14-21 days, check your bucket that’s been sitting, undisturbed and unopened. Open it for the first time to see how things look.
Here’s what you might see (& smell):
- White Mold and Vinegar Smell — Perfect. That’s what we want. This indicates that our fermentation has taken place. Move to Step #6.
- Nothing. Things Look the Same — That’s fine, all this means is that we might need some more time and a little more liquid to help support the fermentation process.
- Black Mold & Putrid Smell — Uh oh! Things went rancid. This has *rarely* ever happened to me. The advice I’ve received here is to just bury this (deeper than normal) asap and add more bokashi to the top layer before covering it up with soil. Not so bad, right?
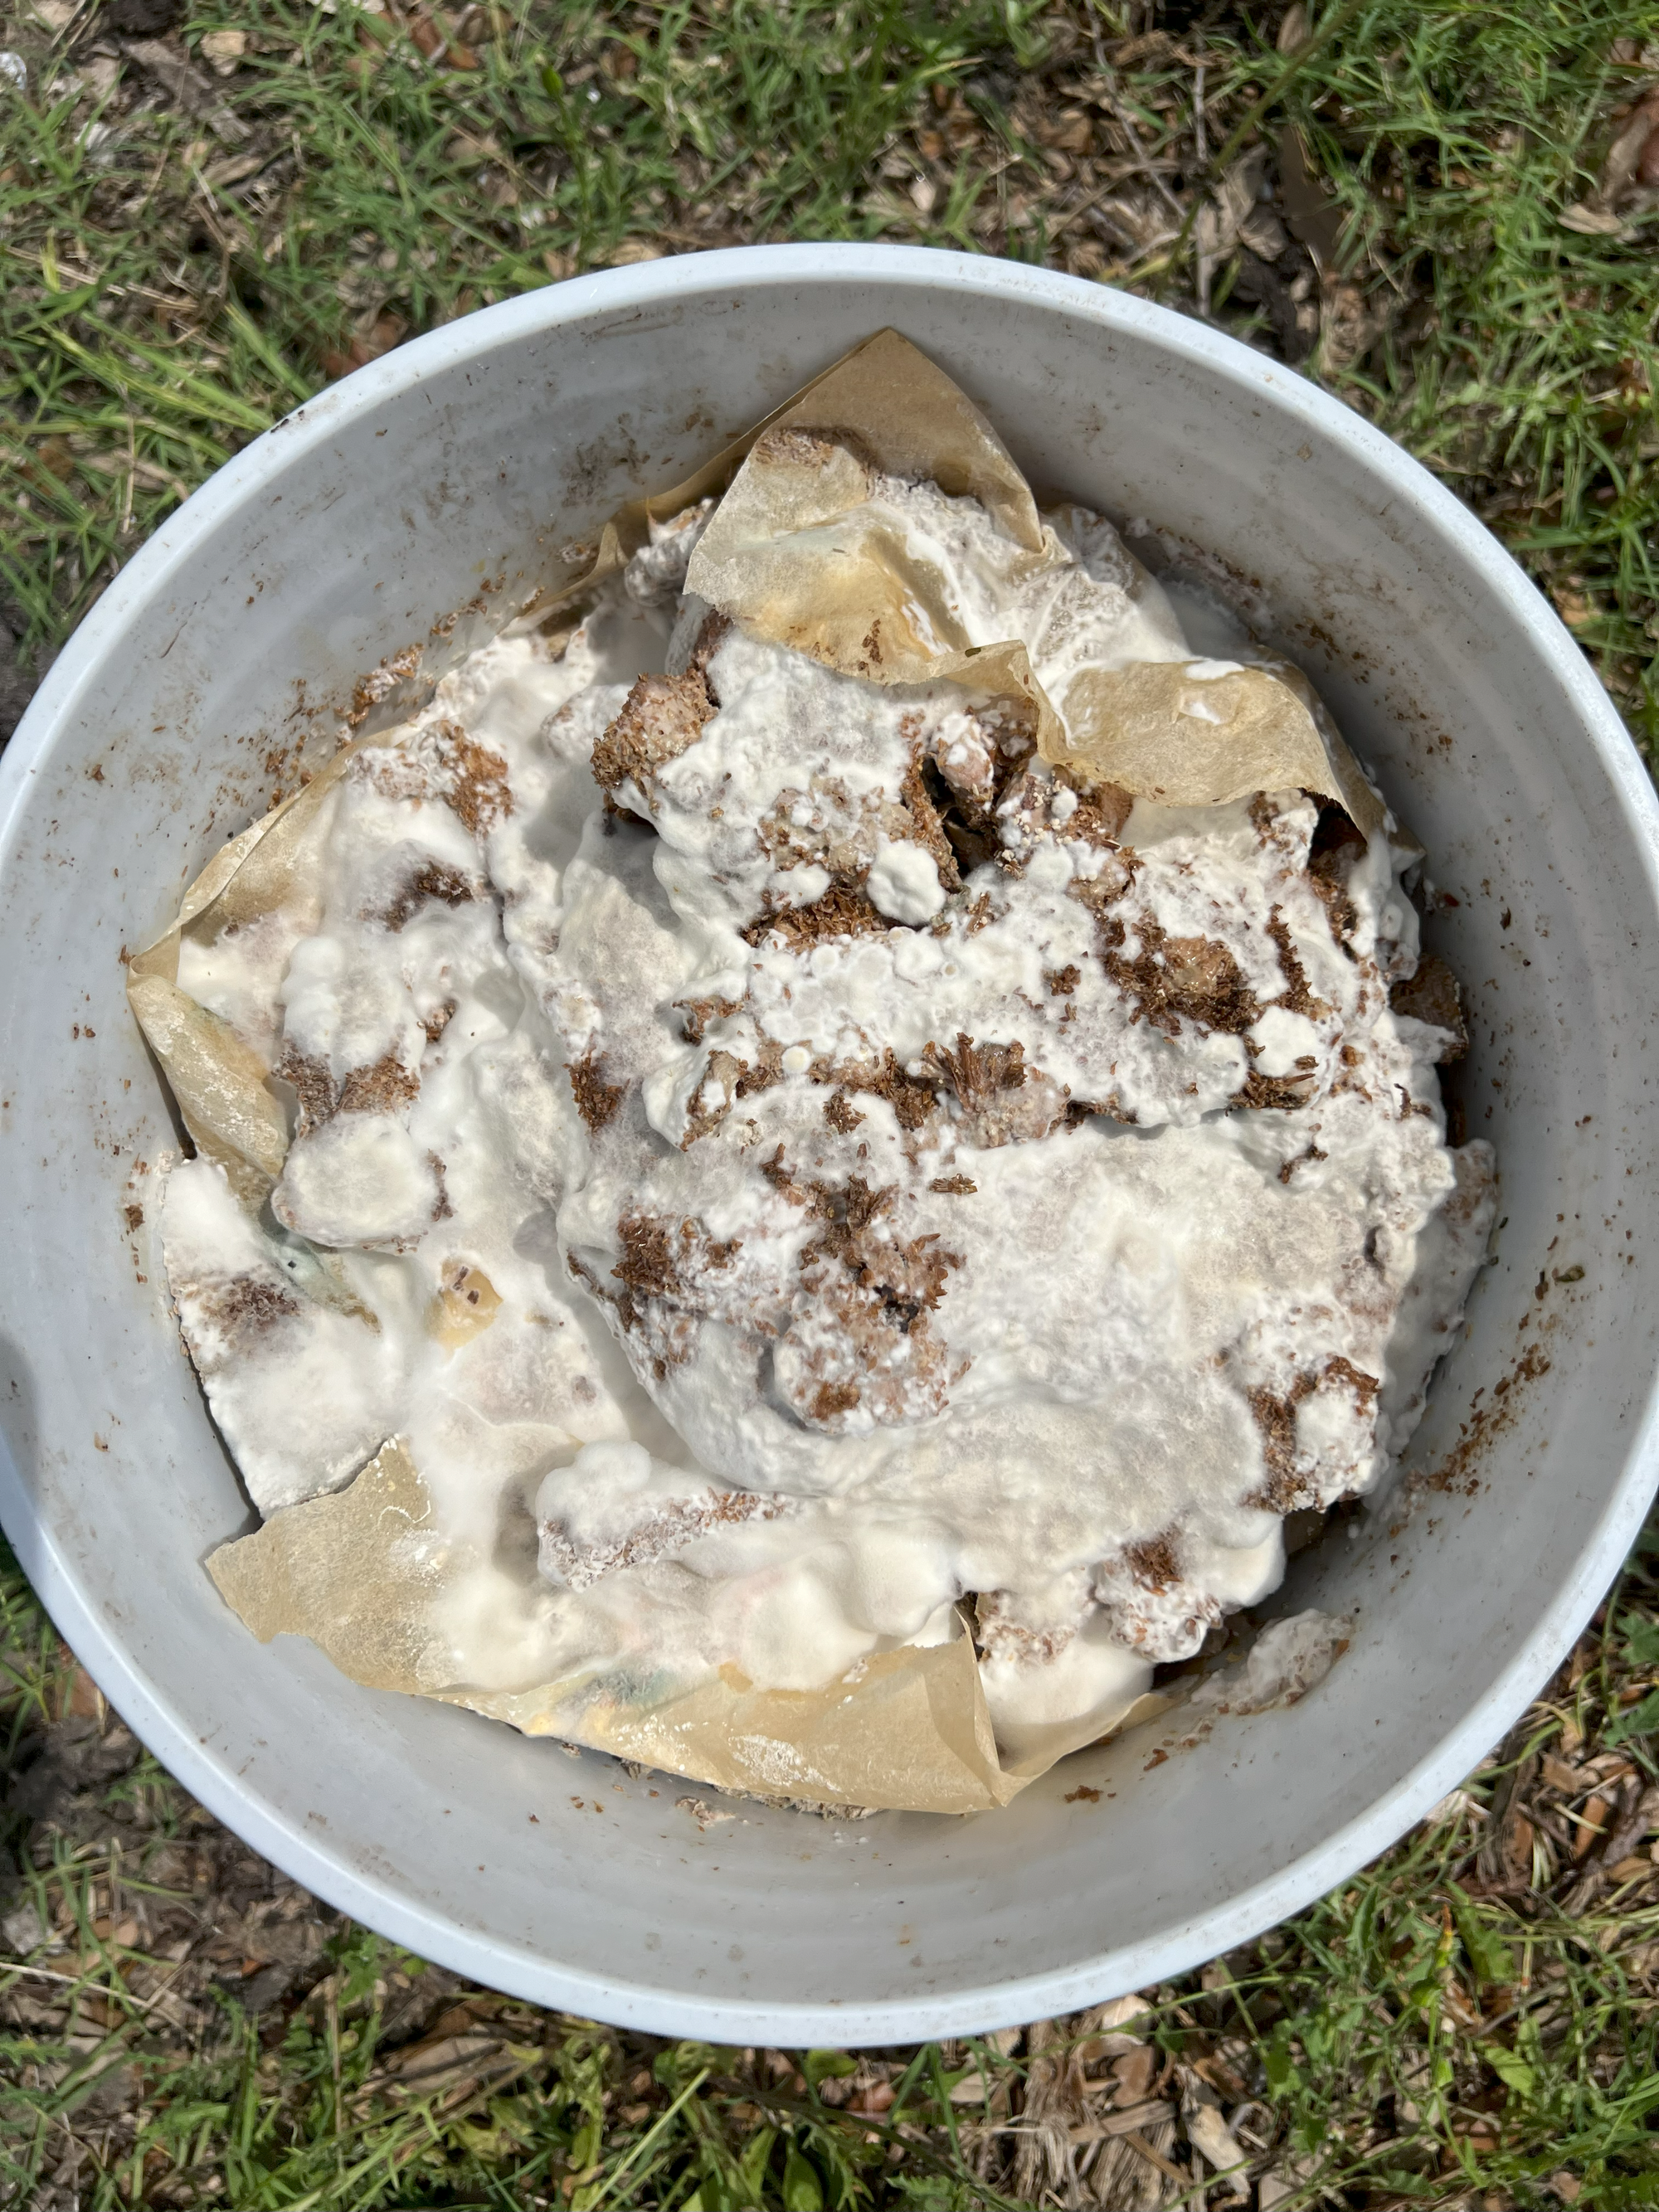
⬆️ Example: White Mold — Perfect!
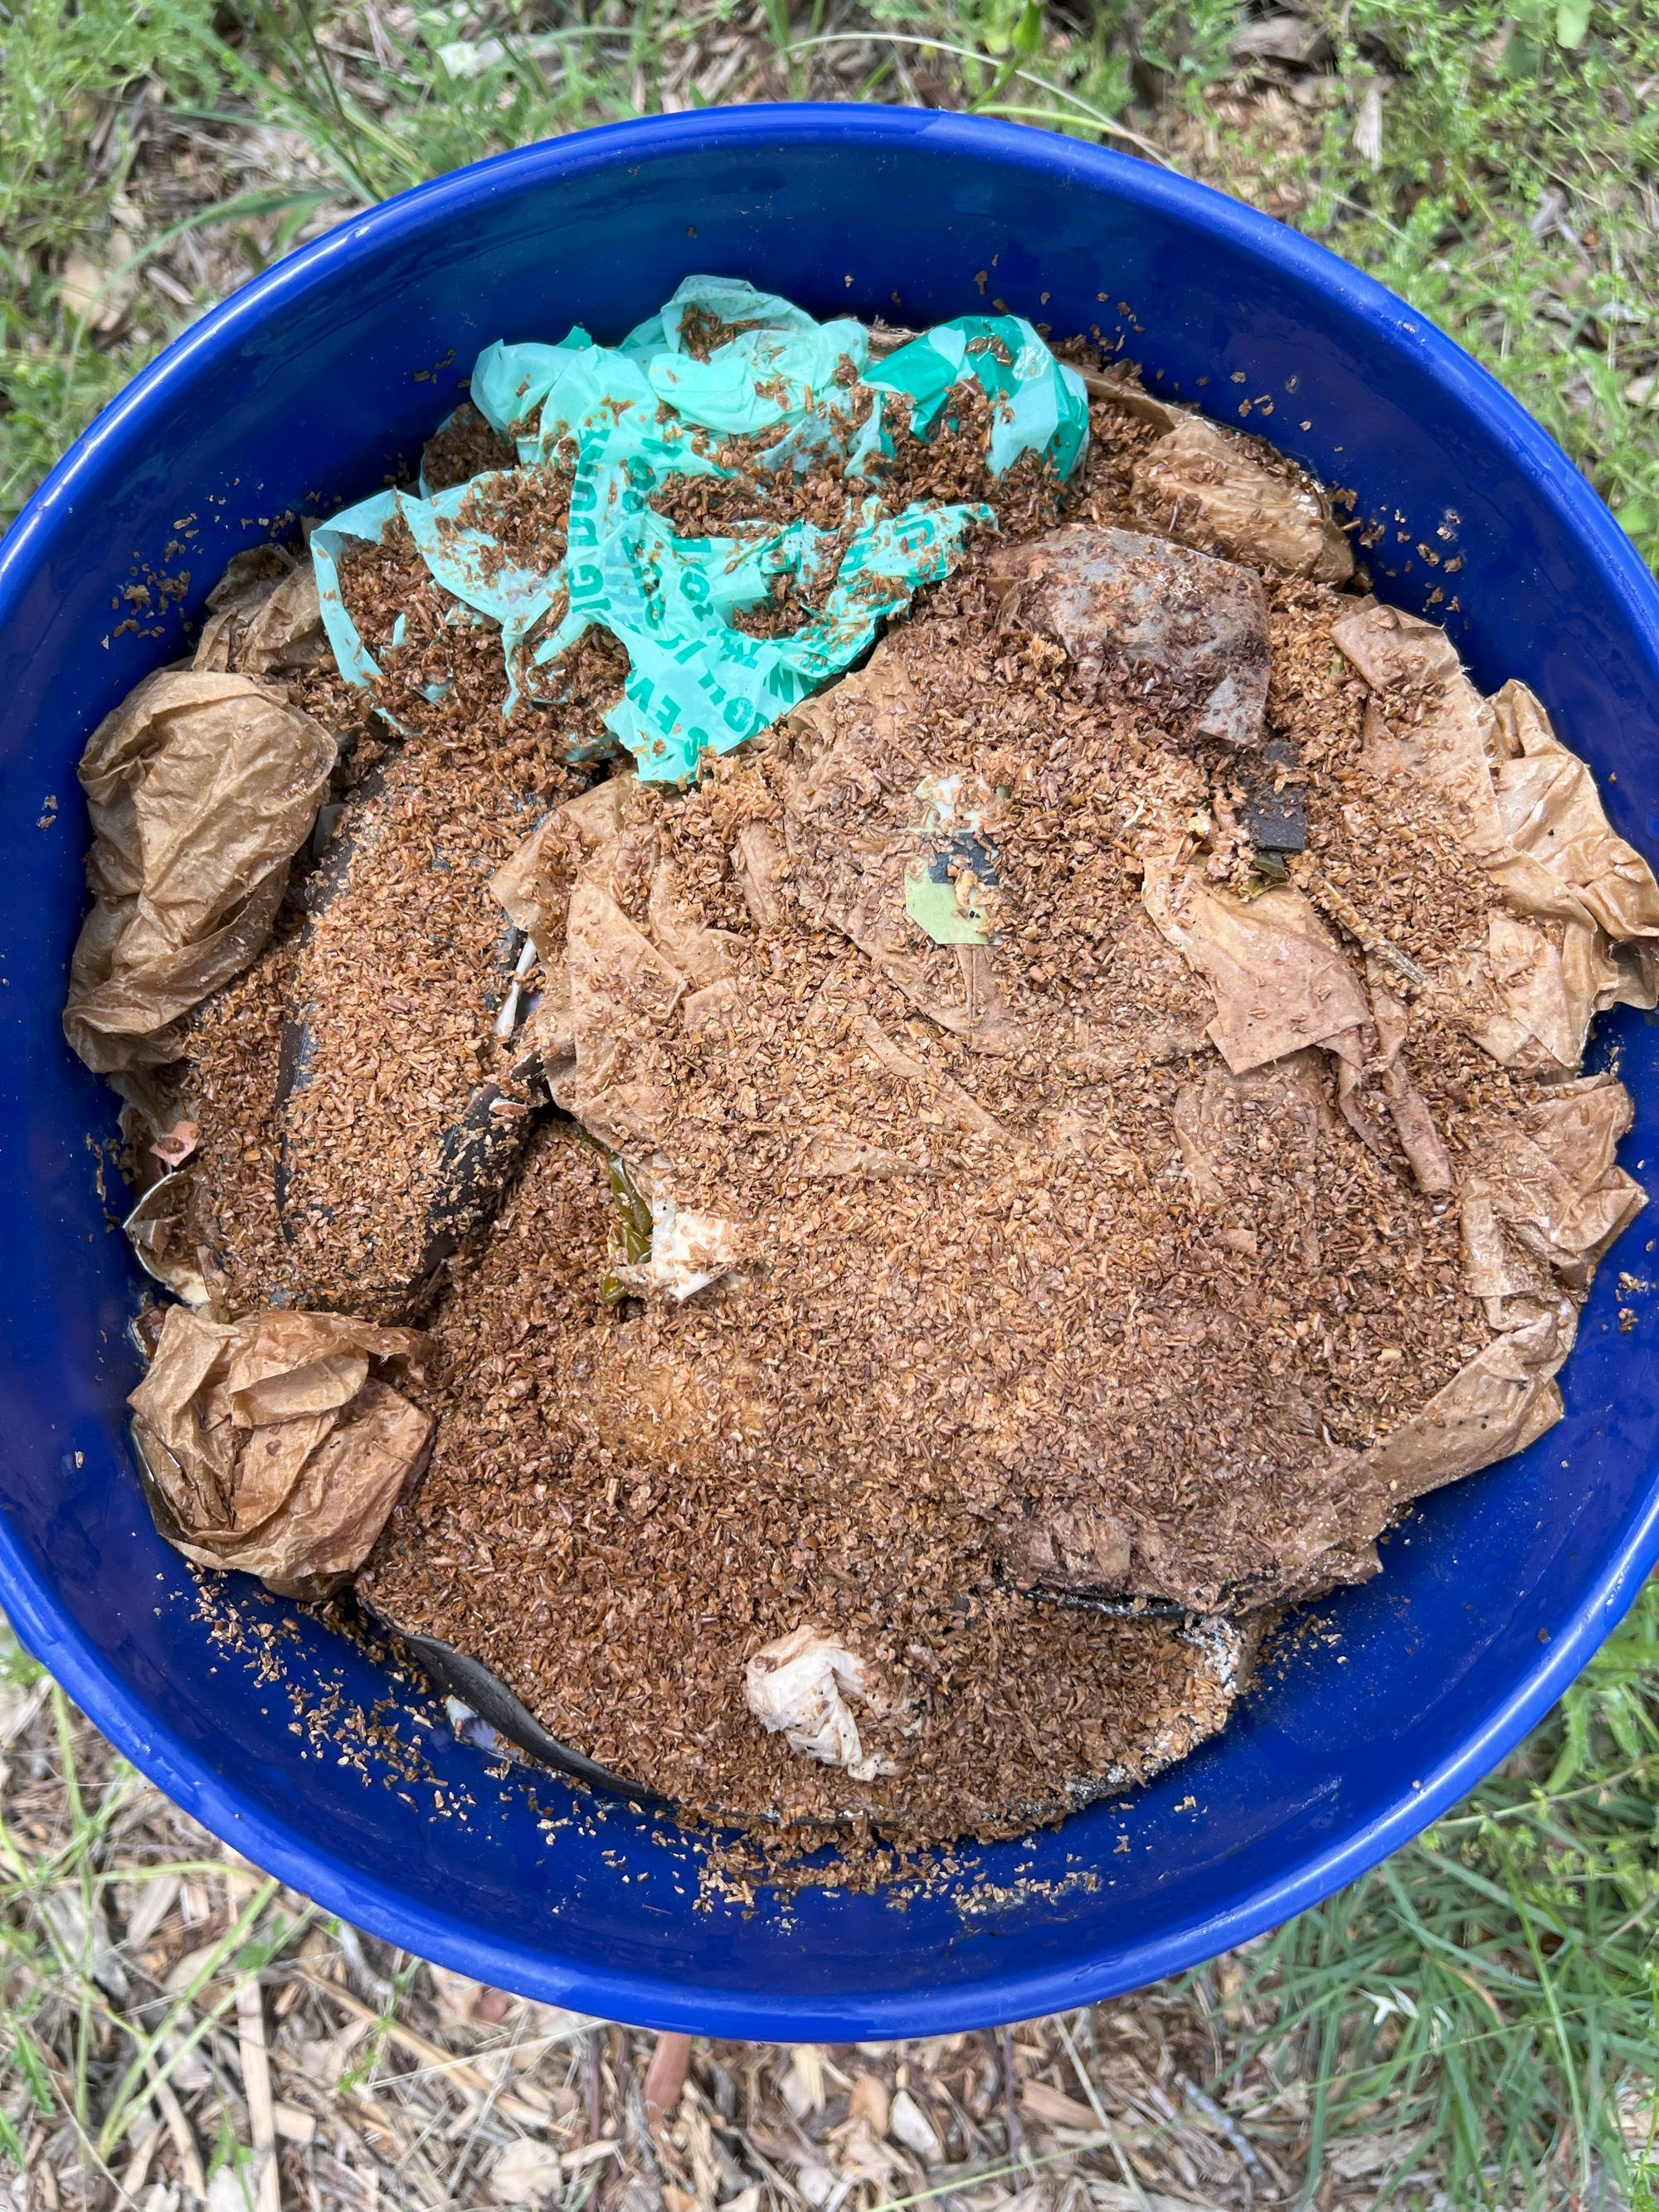
⬆️ Example: Nothing, really. Okay, you can add liquids or dig into the ground (I usually dig).
6. Provided our bin’s contents looked as we’d hoped, we now need to locate a spot in our yard, garden, or existing composting system to add our bokashi pre-compost.
If digging a hole in the yard/garden, dig deep enough to be able to cover the pre-compost with ≈6 inches of mulching material and soil (I often use oak leaves! We have tons!) Alternatively, you can dig more shallow holes by digging multiple holes instead of one.
7. As you add your fermented food scraps to the hole, mix it with the existing soil that you dug out. We want to increase contact between our scraps (now pre-compost) and the soil ecosystem.
8. Once the pre-compost is mixed in and adequately covered by more mulch and soil, let it sit for 4-6 weeks for the process to complete. Or, if you added your pre-compost to a compost bin, you can turn your compost pile periodically.
9. After 4-6 weeks, you should have finished compost. Some scraps may still be present (that’s okay!); you can dig up the available compost, plant on top of it, or keep it in your compost bin for later use.
10. Don’t forget to hose out your bin! I like to let it sit in the sun for a few hours to dry and make sure to reduce any/all leftover odor.
11. Repeat.
5-Gallon Bucket Variation
1. Add your food scraps to your kitchen compost caddy (optional: lined with a compostable bag liner).
2. Once the kitchen compost caddy is full, add your scraps to your bokashi bucket.
If this is an empty bucket, start by adding a layer of cardboard, paper towels, etc. anything that will soak up extra moisture in the bucket as we go. Then, add an initial layer of bokashi bran on top of that cardboard before adding food.
Add ≈half your caddy to the bucket and layer in some bokashi bran. Add in the second half of your caddy, and layer in more bokashi bran.
Using your tamper or cultivator, tamp down the scraps and bran to reduce any potential air pockets.
Some advice will tell you to add a plastic bag or something on top to further seal the scraps and reduce air contact for the anaerobic process to take place. I’ve never done this! I imagine it could be *better* (that’s why I like the bin I use in the first step-by-step variation), but not necessary. Hasn’t slowed me down in the past.
Plastic seal or not, when finished adding anything seal your bucket and ensure it’s airtight. This is the only way that you can really screw up the process!
3. Repeat #2, adding scraps when your kitchen compost caddy is full until your 5-gallon bucket is full. Add scraps, layer bokashi, compress. Simple.
4. When your 5-gallon bucket is full, do one final compression and layer of bokashi bran. Seal the bucket airtight. Double-check! Then, set your bucket aside outside, preferably in a warmer place, for ≈14-21 days.
5. From here, Steps #4 onward from our first variation are identical to the 5-Gallon Bucket variation.
Troubleshooting
I’ve mentioned this before, but the most common reason that bokashi fermentation fails is too much exposure to oxygen. So open your bucket/bin as infrequently as you can and make sure it is sealed!
Beyond that, the next reason for failure is too little bokashi bran contact. Make sure that with each addition of food scraps, there’s good contact for everything with the bokashi bran. This is another reason I like the Organko more than the 5-gallon bucket because you’re adding small amounts of food scraps and small amounts of bran more frequently.
Finally, when you go to bury your fermented scraps, dig them deeper than you think. The only time I’ve ever had any issue with pests (ants, maggots) or our dogs, is when I didn’t dig the fermented food scraps in deep enough. My hunch is that also, my fermentation wasn’t completely finished, either. This made it more enticing to be dug up by someone!
FAQs
Is Bokashi Composting Messy?
Minimally! If you go with the premium Bokashi bin, I’ve found that to be most optimal for keeping the process as clean as possible. Even with the 5-gallon variation, I’ve found this composting process cleaner than most unless you’re just holding your scraps for a city/company weekly pickup.
How Long Does Bokashi Composting Take?
After filling your bin, you need to let the fermentation process work its magic for ≈14-21 days. After it’s done and you bury your scraps, you’ll need to wait about ≈4-6 weeks for usable compost.
What is the Biggest Challenge with Bokashi Composting?
See the troubleshooting section above. Too much air, too little bran contact, and digging deep!
Who is Bokashi Composting Best For?
If you are someone who actually wants to use your compost then Bokashi is a great method for you if:
- You have room to store buckets/bins (2-3)
- Have a place to bury your fermented scraps (compost heap, yard/garden)
- Have a hose and have the space to hose your buckets down!
Bokashi could work in a smaller space, but it might not be the system I’d first recommend unless you’re handing off your fermented scraps to a friend who has the space! Annie and I had our apartment-dwelling friends do that for a while. We showed them how and gave them the bran when their bin was full, we held onto it and gave them another one.
Good tip for you!
Does my Bokashi Bucket/Bin need to have a Drain?
No, not necessarily. Having a spigot can be nice to get the bonus of the bokashi juice. However, if you don’t have a spigot, just be mindful of how “wet” things are in the bucket. With our 5-gallon drainless bucket, I’d just make sure to add our paper towels, toilet paper rolls, etc., to soak up extra liquid. Never had a problem!
Sources
Compost City: Practical Composting Know-How for Small-Space Living from the Kitchen Counter to Community Composting and Beyond by Rebecca Louie